You’re setting up your home studio, and you’ve already plugged in the computer. You’ve set up your monitors and your desk. It looks like things are almost done. Guess what? It’s time to treat your room. You want it to be the best possible listening environment you can have. However, you are most likely on a budget. There are ways to get things set up with a minimal amount of money. We will try to go over the most basic of the basic setups here. First, the Sound Absorbers Foam is pretty affordable here. Just don’t waste your time with egg cartons or that foamy stuff people top mattresses with. Those won’t help. I hope I saved you the trouble of doing that. I know I linked to these last week, but these taught me a lot when I started:
Sound on SoundStudio rescue (Watch the full series when you can)The Producer’s Manual
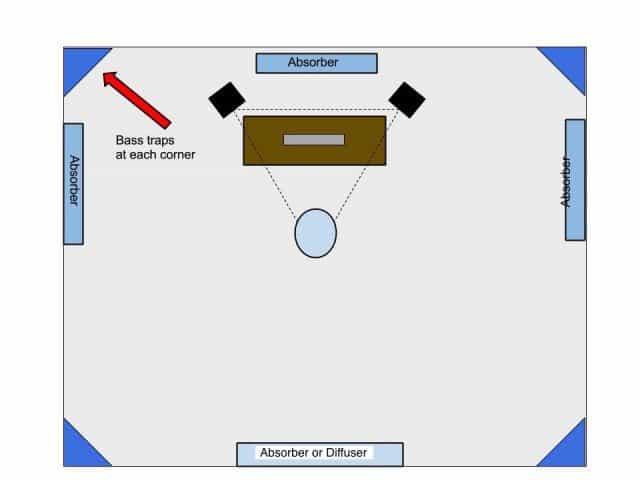
Here is the most basic setup You will want when you get acoustic panels (Please excuse my Google Draw skills. It was my first time using it, and I was pressed for time.)
As we explained last week, your head should form an equilateral triangle with the speakers. You should be lined up with the cones. Centered behind the speakers, at their level should be a sound absorber. That will tone down odd reflections that bounce off that back wall. To either side of you, should be two more absorbers. The best way to place these is to have a friend slide a mirror along the wall at speaker level. As soon as you see the cone of your speaker in the mirror (from your main listening position) you place foam there. Do the same for both left and right. Behind you, another sound absorber. However, a diffuser is a nice alternative. This is often made of wood. It’s designed to sort of scatter, or break up sound traveling into it, so it doesn’t reflect back to you. You can see one below. It looks like a block of wood with a big mess of randomly sized wood blocks on it.
If you’re crafty in the tool shed, you may be able to make your own. However, I learned in the Producer’s Manual (again, a very awesome book I suggest you invest in when you have some extra cash) that if you have a tall enough book shelf, you can use that as a diffuser. Put it on the wall directly behind you. The random books and other junk you likely keep in it (if you are like me) will actually diffuse the incoming sound, creating a cheap, already-available diffuser. Each corner has a bass trap. These are usually triangular, and go in corners as shown. I’ve read before that you can probably never have too many of these. However, the most important places to cover are at speaker level at each corner of the room. If you have the budget, place more along those corners and even along the corners where the wall meets the ceiling. Some folks put foam right above their listening position. If you can, go for it. Most of us have a ceiling fan that won’t allow it. Further help: Arc System 2 I like this software. I have this based on a friend’s recommendation. You can check out his stuff here. (He’s a talented musician, and more people need to hear his work.) Arc is a piece of software that helps compensate for inconsistencies in your room. You set up your room exactly as you plan to have it when you mix. Then you use the included microphone and take some measurements from several listening points around the mix position. This measures the frequency response of your room. After that, you insert Arc 2 at the end of your plugin chain. If gives you a more realistic sense of what your mix sounds like. Really, it’s just designed to give you a flatter frequency response. This helps you better judge when your song needs more or less bass, etc. It’s really cool. When you are done, turn off the plugin and export your song. As you get used to it, things should start to sound better when you listen in your car. We’ve all had something sound awesome in the home studio then terrible in the car. That’s it for this week We’ll see you again next time. You can catch up with parts 1 – 3 here:
Part 1Part 2Part 3
Comment Name * Email *
Δ Save my name and email and send me emails as new comments are made to this post.


![]()
