Although you can always manually type in HTTPS://www.name-of-site.com into the address bar to test if a site has SSL enabled for all its pages, not only is that time consuming waste (imop), but that still leaves sinkholes for unencrypted redirects. The solution for you conspiracy Security freaks out there (like me)?? Using a Firefox plug-in from EFF (Electronic Frontier Foundation), you can now secure all your surfing just by sitting back and letting it handle the encryption on all your pages automatically. Ahhh….
Update:
Google Chrome now offers a similar plugin as reviewed below for Firefox. It’s called KB SSL Enforcer. Feel free to grab it and give it a try!
What is SSL?
SSL (Secure Socket Layer) is the time-tested security protocol for encrypting information sent across the Internet. Nowadays, SSL has been replaced by the new but similar TLS (Transport Layer Security) and it is often used everywhere on the web for email, messaging, faxes, and file transmission. Typically data is encrypted using 1024-bit and 2048-bit RSA. In other words, it helps keep people from eavesdropping in on what you’re transmitting between your computer and the destination server.
How to Encrypt All Of Your Firefox In SSL Using A Firefox Add-on
Step 1 – Installation
Visit the add-on’s website https://www.eff.org/https-everywhere. Here, Click the big blue button that says Encrypt the web: Install https everywhere. After you Click this, Firefox will attempt to load the xpi file, but you’ll need to Click Allow to give it permission.
Step 2 – Installation
Wait for the countdown timer on the button to reach 0, and then Click Install! The add-on will now automatically install.
Step 3 – Installation
Once installation finishes you’ll be required to restart Firefox. You can do this manually by completely closing Firefox and opening it back up, or just Click the Restart Firefox button that appears in the Add-ons pop-up.
Step 4 – Adjusting Options
To open the options for this add-on, we’ll have to access it via the Firefox Tools > Add-ons menu.
Step 5 – Adjusting Options
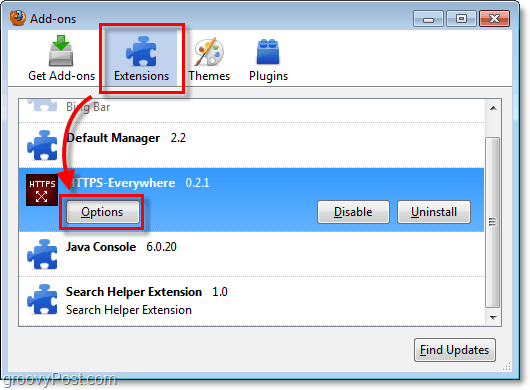
Click the Extensions tab of the Add-ons window and then under HTTPS-Everywhere Click the Options button.
Step 6 – Applying Rules
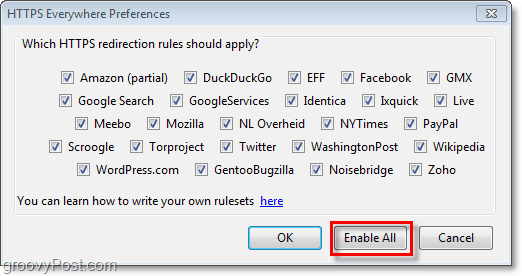
Now you should be in the preferences window; here you can manually select every popular site you want to use SSL with, or just Enable All of them. If you ask me, you might as well enable all of them, especially if you are on a Public network. You can also create your own rules and add your custom list of sites to the add-on. This process will require a groovy article all of its own to explain, but in the meantime, EFF has a great guide on their site.
Once you’ve set up HTTPS everywhere, it will redirect all of your web traffic to the popular sites you’ve selected so that you’re always using the HTTPS version. Comment Name * Email *
Δ Save my name and email and send me emails as new comments are made to this post.


